Alert Monitor and Call Logging
1. The Alert Monitor
“Alert Monitor is a flexible issue tracking tool used to notify… employees of important events.” (From the Alert Monitor help page) At ITS, coordinators and student workers use Alert Monitor to assign and respond to calls or “missions”. Only individuals with accounts on the HEAT system can access Alert Monitor. If you need an account, please talk to one of the coordinators.
When you double-click on the Alert Monitor icon (usually on the desktop or at Start -> Programs -> HEAT -> Alert Monitor) and log in, a window similar to the following appears:
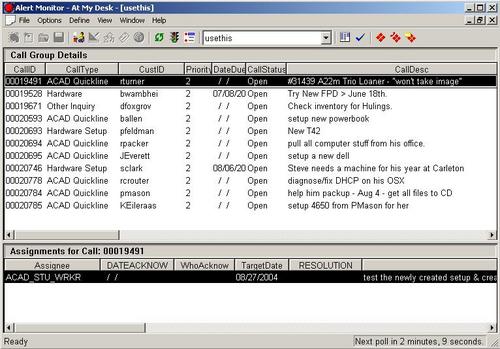
Figure 1. The Alert Monitor window
The Alert Monitor window consists of two horizontal window panes. The upper window pane (Call Group Details) consists of a list of active calls. Each call consists of one or more assignments. The Call Group Details window pane has the following columns:
CallID: A number to identify the call, mostly for internal use.
CallType: The type of the call. This is based on the type of problem to be solved (for example, Hardware Setup) or the group to which the call is assigned (for example, ACAD Quickline if it is assigned to ACAD student workers).
CustID: The net ID of the person for which the call is being performed. For example, if the call is to set up a new computer for a faculty member, the CustID of the call is the net ID of the faculty member.
Priority: The priority level of the call (1, 2 or 3).
Date Due: Date by which the call should be completed.
CallStatus: Status of the call. (Open or closed). Student workers can generally see only open calls.
CallDesc: A short description of the call.
The lower window pane (Assignments for call) lists the different assignments created for the selected call and their details.
2. The Call Logging window
2.1 Call Logging window, Work Groups:
Calls can be created, edited and responded to in the Call Logging window. It can be opened by double-clicking any call in the Alert Monitor, by clicking on the Launch Call Logging button on the Alert Monitor toolbar or by going to Start -> Programs -> HEAT -> Call Logging. Only individuals with accounts on the HEAT system can access Call Logging
Calls are divided into Work Groups. If you open the Call Logging window by double clicking a call in Alert Monitor, the call will open in its associated work group. This is what a Call Logging window with a call open looks like:
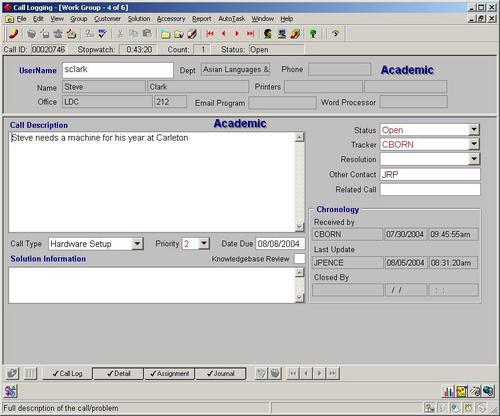
Figure 2. The Call Logging window with an open window
Notice Work Group – 4 of 6 in the title of the window. It means that the current work group has 6 calls and we are viewing the fourth call in the group.
If you open Call Logging from the Start Menu, it starts up without any calls open. You can then view the calls from a particular group by going to Group -> Open Call Group…:

Figure 3. Open Call Group in Call Logging
Examples of common work group options set up at ITS are ACAD Stu Worker Calls (calls for ACAD student workers) and All Calls (all call records). Some work groups relate to the logged-in account only, for example My Unack Assignments, shows unacknowledged calls for the logged-in person.
2.2 Working with calls
2.2.1 Parts of a call and responding to calls
Each call is created for a particular person, for example a professor or a staff member. The upper window panel in the Call Logging window (see, for example, Figure 2) shows the details of this person, with his / her username, department, full name, office and so on.
The actual call, which is displayed in the lower window panel, consists of four parts. You can switch between these parts by clicking on the tabs at the bottom:
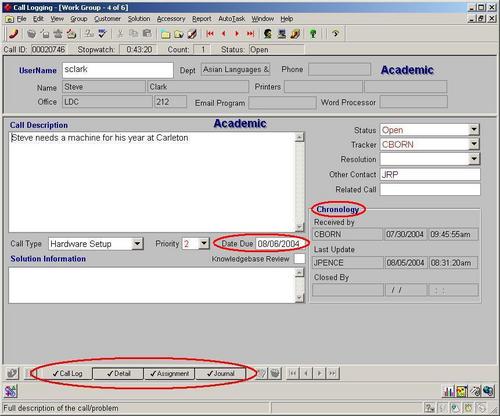
Figure 4. Parts of a call and the Call Log
2.2.1.1 Call Log: The call log contains general information about a call: the Call Description, the status of the call (OPEN, CLOSED, ON HOLD, PENDING or REOPENED), the user ID of the Tracker (this is usually the coordinator who created the call), Resolution, Other Contact and Related Call. It also contains a chronological record of the call under Chronology, which contains the time and date of, and user IDs of individuals who received, updated and closed the call. Another important part is Date Due, which is the date by which the call is expected to be completed.
2.2.1.2 Detail: Not all calls have this part. For calls that do, it contains additional information about completing the call. For example, if the call is for setting up a computer, the Detail section might contain more information about the hardware and software needed, such as in the screenshot below:
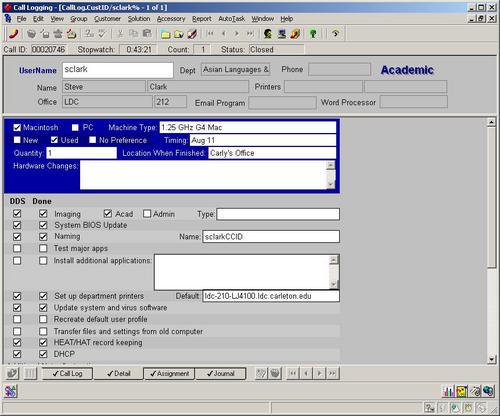
Figure 5. The details of a call
2.2.1.3 Assignment: This part of the call displays the assignment(s) associated with a call. Usually, every call has at least one assignment, and some calls may have more than one, often assigned to different groups or individuals. New assignments for a call can be created by clicking the New Entry button at the bottom and one can move between assignments by using the small blue arrows near the New Entry button:
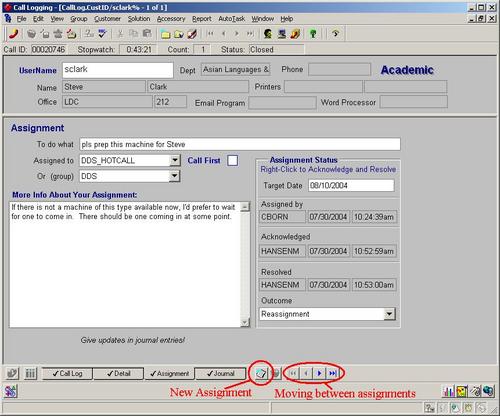
Figure 6. Assignments
Each Assignment window contains details about each assignment, such as a description of what to do, and the status of the Assignment. On the right is the Assignment Status box, where workers can Acknowledge assignments (that is, record that they will deal with it) and once the assignment is done, mark it Resolved and record the Outcome. To acknowledge an assignment, right click on the box below Acknowledged and click on Acknowledge, and to mark that an assignment has been resolved, right click on the box below Resolved and click on Resolve:
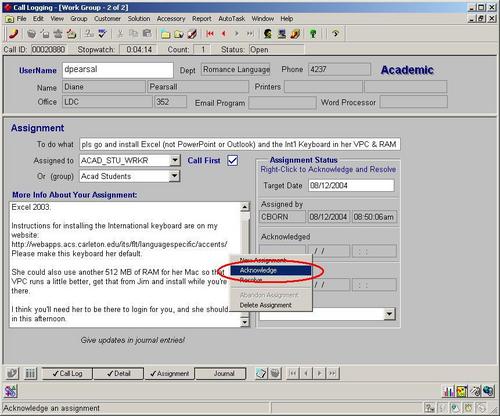
Figure 7. Acknowledging an assignment
2.2.1.4 Journal: The journal is where entries about progress on the call are recorded. As a student worker or a coordinator makes progress on a call, he or she can make entries in the journal stating what has been done to that point. The journal window is similar to the Assignments window. New journal entries can be created by clicking the New Entry button and one can browse entries by clicking the small blue arrows near the New Entry button.
2.2.2 Creating a new call:
To create a new HEAT call, first make sure that you are in the right Work Group. As described above (in 2.1), open the list of available Work Groups by clicking Group -> Open Call Group…, and select the correct work group. For example, if the call is for ACAD student workers, select Acad Stu Worker Calls.
Now, select File -> New Call Record or click the New Call Record button on the toolbar (the button with the red phone, see Figure 8). Select the customer type in the dialog box that appears; this indicates what type of staff you are making the call for, for example, if the call is related to a faculty, the type is Academic and if it is related to administrative staff, the type is Administrative. For ACAD student workers, Academic is the most common customer type.
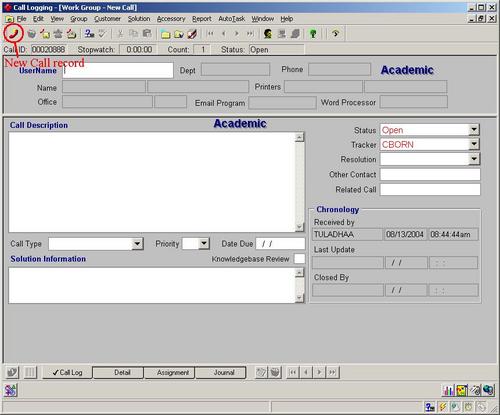
Figure 8. Creating a new call record
In the new call record window, enter the username of the person related to the call. HEAT has a database of all academic and administrative staff, so that when you fill in the username, it automatically fills in the full name, department, phone number and other details about the person. Call Logging will not accept the username if it is not the HEAT database, which may happen if the person in question is a new staff or faculty member. Student workers don’t have enough privileges to create records of people in HEAT, so ask a coordinator to create a record of the person for you. Sometimes, the username is that of a room (such as a lab) or a generic username (such as for a student machine in a department). Ask a coordinator if you are unsure of which username to use.
Next, fill in the following items in the Call Log:
Call Description: This is a description of what the call is about. Try to give all the information that is available to you. For example, if the call involves a piece of hardware such as a computer or a printer, it is helpful to include the CCID # of the hardware in question.
Call Type: This is the type of the call. Select one from the drop down list. Some common call types are:
ACAD Quickline: A call for ACAD student workers.
Hardware Setup: A call for hardware setup. If the call involves setting up a new computer, its type is Hardware Setup.
Most other call types are self-explanatory, such as Email, Networking and Printing.
Priority: This is the priority of the call and can be 1, 2 or 3. Most calls have a priority of 2, urgent calls have a priority of 1. Select a priority on the basis of when it is expected to be completed.
Due date: The date by when the call is expected to be completed.
Tracker: This is the coordinator or supervisor who will track the progress of the call. Most of the time, this is the username of the coordinator who has asked to make the call. Select the username from the drop-down list.
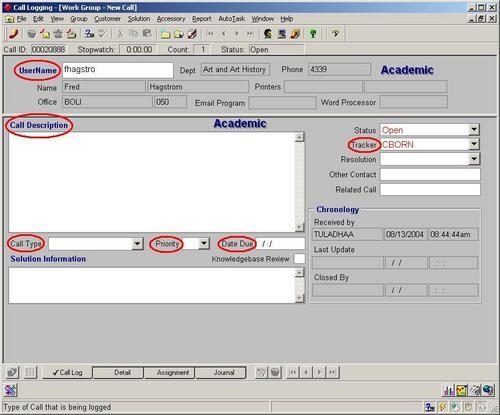
Figure 9. Fields to complete in the Call Log when creating a call
Next, select the Detail tab at the bottom of the window. Depending on the call type, the detail section will contain different fields. For example, for a Hardware Setup call, this section will contain fields about the type of computer, the type of image and additional instructions. Fill in these fields. Some types of calls have no Detail fields associated with them.
After the Detail section, select Assignment, and create a new Assignment (see Figure 6). A call has one or more tasks associated with it. Create a new assignment for each of those tasks. The following fields have to be completed to create an Assignment:
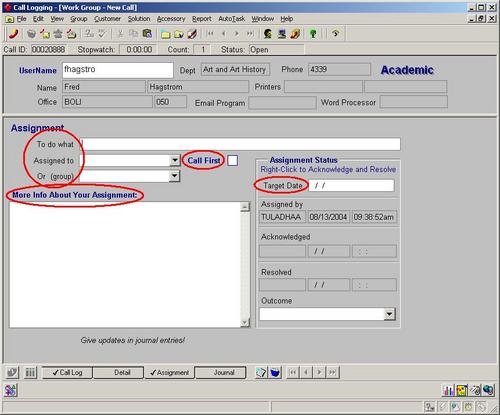
Figure 10. Fields to be completed when creating an assignment
To do what: A short description of the task.
Assigned to Or (group): The individual or group for which the assignment is targeted. Common groups are DDS_HOTCALL (for DDS), ACAD_STU_WORKER (ACAD student worker).
Target Date: Date by which the assignment is to be completed.
Call first: Check this if the person has to be called for availability before completing the call.
An important thing to note when creating calls is that student workers don’t have enough privileges to delete a call. If you accidentally create an unnecessary call, put a note in the call saying so and a coordinator will delete it for you.